
First question – why should you learn how to fix overexposed photos? Because when you hang out with your friends and go far away from your home, you take too many photos from excitement with superbly smart gadgets like DSLR or iPhone.
But when you get back to your home by road and start checking your taken photos, you find some of these are almost burnt! Why does it happen? Because sometimes your gadgets struggle a lot to maintain accurate exposure.
But it’s not a worthy solution to delete those photos. Sometimes those photos carry some lovely faces that won’t let you delete them at all!
So, you have to find a worthy solution to eliminate the overexposing issue from your photo. And in that case, I’m here to help you out!
When Should You Say That the Problem is Overexposing?
Contents
First of all, you have to admit that – Overexposing is not the only factor behind ruining your photo. Rather some other factors exist.
So, before blaming the overexposing problem and seeking for the process of how to fix overexposed photos, check out the following lines first –
Are you busy on screen for so long?
Keeping busy your eyeballs on your smartphone or laptop screen for so long affects your eyesight. Even when you return home on a sunny day, you see everything dark around you for a while. After a while, your eyes heal gradually, and you get back to your normal eyesight.
The same thing happens on screen. If any particular photo seems overexposed to you, it doesn’t mean that you couldn’t nail the shot! Rather, it’s your very eyes that are responsible for this happening! Because your eyes are not in normal condition to judge photo quality.
When you open your photo on the desktop, what happens?
When you capture a photo with your beloved smartphone or camera, you think you nailed a shot! But when you open it on your laptop or desktop, you’ll notice the photo is faded or overexposed.
So opening your photo on a desktop can be considered the easiest tool to initially figure out the overexposing or underexposing problem.
Is your camera in Automatic Mode?
Modern cameras like DSLR are way smarter than their predecessors – no doubt! But in reality, still, these are not worthy enough to compete with human eyes! And sometimes what happens – your camera can’t meter the light correctly while taking photos.
And it frequently happens when your camera is in automatic mode that uses default settings to take the shot. Consequently, you get your photo overexposed.
Why Your Photo Gets Overexposed?
The exposure triangle wrongly exposes your scene by combining ISO, shutter speed, and aperture.
In manual mode, it’s simple to overexpose a photograph.
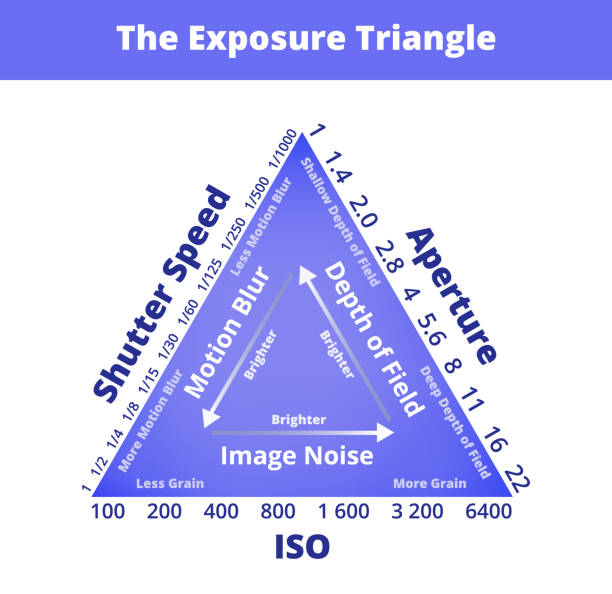
For example, you may have set your ISO too high. On a sunny day, stick to ISO 100-200, not 800. After determining your ISO, you should consider your aperture. Less f-stop means more light entering your lens. The more light hitting your sensor, the more likely you are to overexpose. Try reducing the aperture for better exposure. After ISO and aperture, focus on shutter speed. If your image is overly bright, slow down. Reducing it to 1/600th will assist if it doesn’t effect other settings. The exposure triangle’s finest feature is its interdependence. If you increase the quantity of light entering your lens, you must reduce it.
We can relate this with a real-life example.
When you look at the floating yacht on a sunny day, you can easily see the brightest shiny part of the boat appropriately. On the other hand, you can see enough details of the darkest part where sunlight struggles to reach.
You can easily see that, And at the same time, you can enjoy the crystal clear blue sky with few clouds. After all, you get an accurate picture of your photo with your eyes without losing any significant details. Because your eyes somehow can pick the details from the shaded area.
But the fact is – maybe your camera is so smart considering many aspects. But still, it lacks a human brain! And that’s why sometimes it struggles a lot to do that hard work!
How to Fix Overexposed Photos Perfectly?
Well! Before knowing how to fix overexposed photos, you have to put this word in mind that there are many ways to fix the issue. But if I decide to explain the whole process step by step from scratch, I’ll have to explain the entire process through any particular photo editing software.
But the reality is – different people use different editing software. Considering that – I’m explaining the general process/suggestion to fix extremely overexposed photos.
1. Do Histogram Analysis
The histogram is basically the common tool in every photo editing software. With this tool, you can observe the tonal range of the exposed part of your photo. And it contains three separate parts: dark tones, light tones, mid-tones.
The dark tones feature will allow you to observe your photo’s dark and shadow areas. On the other hand, the light tones feature is dedicated to enabling you to monitor the white and highlighted area. And the overall data will allow you to figure out how to fix over-exposure.
By histogram analysis, you can perform a proper analysis to determine which particular areas your colored pixel fall. Considering that you can figure out what types of light exist in your image.
2. Try to Shoot RAW Footage
It’s a general recommendation for all types of photographers – to try shooting RAW footage with their cameras. Taking photos in JPG, JPEG, etc. formats is okay, but there is a different issue.
When you capture a photo with your beloved camera, the internal function of your camera compresses the image using its advanced algorithm to keep the image size small. During the process, it loses significant details.
If your small-sized photo accidentally gets overexposed, after lowering the exposer, you will get accurate exposure, but your photo will definitely lose details. That’s why taking RAW footage means winning half the battle in this regard.
3. Use Bracketing
Bracketing is basically a technique through which a photographer can capture photos in different exposer settings. It allows the camera to capture photos with a High Dynamic Range (HDR).
To avoid overexposing, you have to set your camera in manual mode. And take three shots with different shutter speeds and exposer to nail the perfect shot.
For instance, if your camera ISO is 100 and you consider setting your shutter speed at 1/1000th and the aperture is f/5.6, you can capture your first shot. Then you may change and set your settings at 1/500th shutter speed and for the +1 exposer value. And then, you can take your final shot in 1/2000th shutter speed and -1 exposer value.
But instead of going for exposure +1 and -1 exposure value, if you consider choosing +3 and -3, then there is a high possibility that your camera is stacking all the photos together to get the resultant image with accurate exposure.
After all, to nail a perfect shot without overexposing issues is mostly depends on your photography skill.
4. Use Exposer Slider
If you use the legendary photo editing software named PhotoShop, the Exposer Slider tool will be a handy tool for you to control the exposer level of any particular image.
Sliding the pointer of the tools to left or right will allow you to overexpose and underexpose your image, respectively. But using your eye, you have to figure out how much explorer level is perfect for the image. Considering that, move the pointer with your mouse cursor.
Remember, moving the pointer right, or left will increase or reduce the contrast level of your photo as well. So using the tool with the amateur hand is not recommended at all.
5. Use Graduated Filter
The Graduated Filter option is widely used by landscape photographers. And one interesting fact is – in most cases, landscape photos are taken from a close distance. Especially when you take a photo of a human or object, landscape mod is the handy way to nail a good shot.
The working principle of Graduated Filter is – it adds an extra gradient of darkness to your photo to enhance the overall visual experience. For instance, you take a shot of a high-rise building, the sky behind the building might get overexposed. Adding the dark gradient on the sky portion can eliminate the overexposing issue and allow you to get a well-detailed image.
Check the video:


