
Everyone wants perfect pictures with proper lighting, camera settings, frames, and angles. But one common problem is the visibility of double chins in images.
So how to remove the double chin using photoshop? or how to fix double chin in photoshop? It is very easy to edit and modify images through photoshop.
In this article, you can find 11 steps to remove a double chin using photoshop. Let’s get started!
How to Get Rid of Double Chin in Photoshop
Contents
Before you start editing, have a glance at the chin area of the photograph. Why? Because you may alter the chin more than necessary. We don’t want our image to be unrealistic, right? Examine the chin in the above image. Don’t focus on a person’s overall appearance, but on how the pixels differ around the face and neck.
The shadow cast by the chin causes the neck area under the chin to seem black. However, in the preceding image, the chin and neck have nearly the same lighting and tone. So we need to create a shadow on the neck to make it darker.
How to Remove Double Chin Using Photoshop
Fixing the double chin is an image reshaping process. It is also known as the liquifying method in Photoshop. Many people seem to have a double chin which you can easily get rid of through photoshop. The first thing that needs to be looked into is your chin area in the picture because your chin might need the most editing.
However, no one wants to get an artificial look in their pictures. So, it would be best to avoid focusing on the general look as there are differences in pixels on the neck and face.
Usually, the neck area tends to be darker than the chin because of the chin area’s shadow. However, you can set all the shades in similar tones through photoshop. Therefore, you can take the help of the shadow creation service to set the picture properly.

11 Steps to Remove Double Chin Using Photoshop
In photoshop, the process of fixing and reshaping pictures is called photoshop liquefying. Here are 11 steps to remove double chin using photoshop:
Step 1: Insert your Image
First, insert your image and create a duplicate of the picture, which will help to make no changes in the original photo. If you want a duplicate layer, you need to select “Layer” and then “Duplicate Layer.” However, it would be best to generate two of the same layers of a single image.
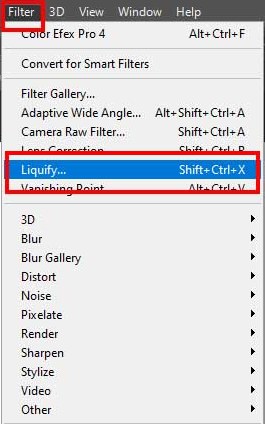
Step 2: Use Photoshop Liquify Option
One important option is ‘Photoshop Liquify,’ which can help remove double chin in photoshop. In the menu bar, you will find the ‘Filter’ option, then select ‘Liquify.’ In another way, you can click ‘Shift + Ctrl + X’ to get your work done.
Step 3: Select Forward Wrap
You can find and select the “Forward Warp” option in the ‘Liquify’ option. This option will help change the different facial functions in a specific part of your face.
Step 4: Adjust your Tools
Before you start working, it is necessary to prepare your image. So, it would be best to adjust the density, intensity, pressure, and size tools. However, it would help if you played with all the options to get your suitable picture. The settings will often vary based on the pictures.
Step 5: Start your Actual Editing
Now, it’s time to start your actual editing and remove the double chin by using a ‘Forward Warp.’ Using this tool, you can fix the different areas of a picture. So, you need to click and drag around the chin areas. However, it would be best to keep the images realistic.
Step 6: Change your Layer to GrayScale
It is necessary to add some noise to your simple image. But remember to make another layer because you might destroy your edits till now. Now, use the new layer and turn it into grayscale. You can easily do this through the ‘Edit’ and ‘Fill’ options.
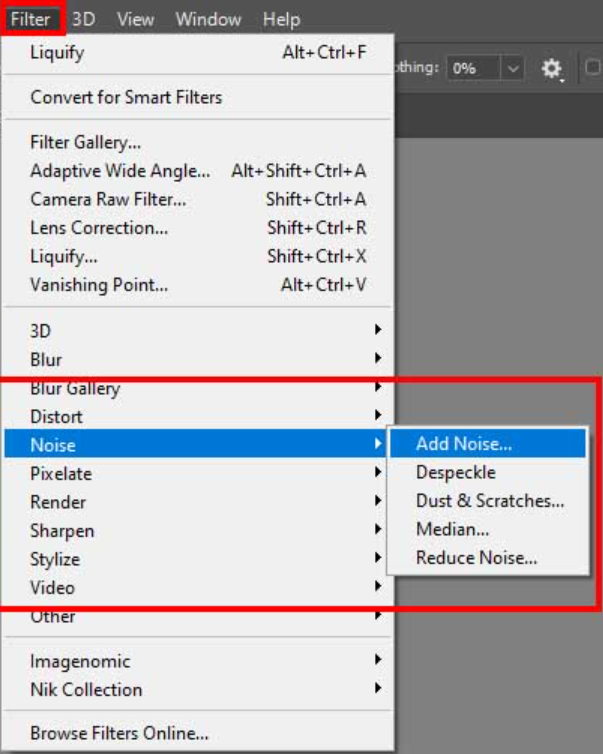
Step 7: Add Some Noise
After making the new layer in grayscale, you need to add some noise to the image. Therefore, you can choose the ‘Filter’ menu to select ‘Noise.’ Under the ‘Noise’ option, you will get many options of noises that you can easily add. Eventually, a window will pop up through which you can apply all the settings according to your needs.
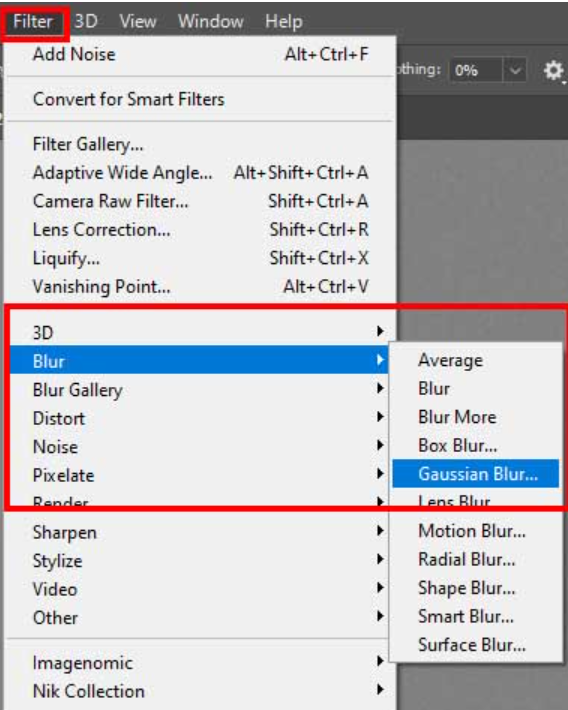
Step 8: Blur Your Harsh Lines
You will see a lot of harsh lines after you add your noise. Therefore, choose the ‘Filter’ option to ‘Blur’ and then ‘Gaussian Blur‘ to make it smooth. The more radius you choose, the blander the layer would seem. If you want a pleasing image, you should experiment with the blurring options.
Step 9: Add Your Clipping Mask
In this part, you need to add your shadow around the chin. It is necessary to create a clipping mask in your project. Therefore, right-click on your layer and choose “Create Clipping Mask.”

Step 10: Use your Shadow Creation
The shadow creation makes a picture more realistic. When you want to add shadow, you need to create different curves adjustment layers. So move on to the ‘Layer’ menu to select ‘New Adjustment Layer’ and then choose ‘Curves.’
You can also make your layer dark by curving down the results. So, you can easily stop when you get your perfect picture. Later, add your shadows through a layer mask but make sure the shadows complement the chin and neck.
Step 11: Repeat Shadow Creation
In the final part, you need to darken or lighten some areas, adjusting all the layers by selecting and dragging the curves.
Final Words
These are the steps that can help you to remove double chin using photoshop. However, other than photoshop tools, you can find many options that can tone up your double chin.
Most professionals use photoshop to get their best outcomes. But learning to shape up your pictures through photoshop can help you go a long way!
You can follow this video to Remove Double Chin:
Frequently Asked Questions
Can you get rid of a double chin in Photoshop?
Yes, you can get rid of a double chin in photoshop by using two different tools. First, you need to use ‘Liquify Photoshop’ and then ‘Forward Warp’ to shape your face.
How do you get rid of a double chin in pictures?
Photoshop is the best bet to get rid of a double chin in pictures. It would help outline the lower jaw by using the ‘Software Selection Tool’ and then ‘Copy’ or ‘Cut’ to create a new layer.
How do I fix my double chin in Photoshop?
One important option is Photoshop Liquify, which can help remove the double chin in photoshop. In the menu bar, you will find the ‘Filter’ option, then select ‘Liquify.’ In other words, you can click ‘Shift + Ctrl + X’ to get your work done.
How do I fix my neck in Photoshop?
Like fixing your chin, you can use the Photoshop Liquify option to fix your neck in photoshop. You will find the ‘Filter’ option in the menu bar, then select ‘Liquify.’
Can you edit out your double chin in a photo?
Sites like RetouchMe – accessible as a website or an Android or iOS app – let you to select a template such as “few wrinkles,” “remove pimples,” or “remove double chin” and have the photo edited for you for around $0.99.


