
To make any photo look sensible and professional, you need to add shadows to the objects in the photo. Photoshop is by far the best photo processing and manipulating software. You can add truly realistic and customizable drop shadows and cast shadows to images in photoshop.
You don’t need any additional lighting equipment or hardware to process the shadows into the photos. The shadows can be developed and added in photoshop with some patience and expertise. The photos can be processed to a point where the shadows look realistic enough with the appropriate lighting and color settings.
In this article, we will discuss drop shadows in detail and the step-by-step methods to add drop shadows to a photo or object in photoshop.
Drop Shadows in General
Contents
In general terms, this effect makes the shadow for the image. Fixing the alignment of the shadow can be difficult since it involves intricate details and requires some knowledge and expertise of light and shadow placement to make it look realistic.
It’s easier to create a drop shadow for larger, less-detailed objects. For smaller and finer details, it can get difficult and problematic (such as shadow for hair). Nevertheless, the quality of the shadow and the final output depends on how it is combined and blended with the actual object.
The shadow might be artificially constructed, but it can’t be isolated, misplaced, or asymmetric from the dimensions of the object.
Process of Adding a Drop Shadow in Photoshop
Adding a drop shadow to an image might seem quite difficult. We provide a step-by-step guide for the process to make things easier for you. The process is as follows:
Separating the Background and the Target Object
- Bring your target image into photoshop.
- Create a new file and make a separate layer to place the object.
- Cut the target object from the image and place it on the new white layer.
- Sort and rename your layers according to your preference. This helps reduce confusion and clutter.
- Click on the eye icon next to the background layer to make it invisible.
You should have your desired object appearing on a transparent background after completing these processes.
Placing the Object on a Background
At this point, you need to create the custom background where you will place your target object. Below is the process:
- You can remove the hidden background at this point if you want.
- Go to Layers -> New Layer, or hit Ctrl+Shift+N on the keyboard to create a new layer.
- The newly created layer can serve as a unique background now.
- Keep the new layer selected and go to Edit -> Fill and pick your desired fill color for the unique background.
- If you want to add custom color, go to the dropdown menu and adjust the fill color parameters to create the custom color.
You now have a unique background to place your object on. This layer will also hold the shadow for your object.
Cast and Drop Shadow Color Resolution
- You can choose your shadow to be of any color available or customizable. Go to Form Shadow and choose the desired color for your shadow.
- Consider the form shadow in your target object.
- Select the Eyedropper Tool while you have the form shadow selected. Once you select the form shadow with this tool, the foreground color will become the same as the form shadow.
- Open the Foreground Color dialog box by double-clicking on it.
- Adjust the color parameters (brightness, contrast, saturation, lightness etc.).
- When satisfied with the color, click Ok.
Add the Drop Shadow
- o to the Layers panel and select the layer with your desired object separated.
- At the end of the Layers panel, click on the fx
- After the Fx dialog box opens up, choose drop shadow.
- In the same dialog box, make the drop shadow the same color as the foreground.
- You can ignore the parameters in the dialog box (distance, blurriness, spread, size) for the time being. All this can be adjusted later in the process.
- When you are satisfied with the newly created drop shadow, click Ok.

Isolate the Drop Shadow in a Layer
- To isolate the drop shadow from its original layer, got to Layers -> Layer Genre -> Add Layer. Click Ok on the warning dialog box.
- This separates the drop shadow from the original layer and allows you to work on the shadow.
Read More: Copy a Layer Mask in Photoshop Elements
Adjust the Shadow Color
- Go to the Layers panel and select the newly created drop shadow layer.
- Go to Edit -> Change -> Color and start drawing your drop shadows under the floor.
Your aesthetic and creative sense and knowledge come into play from here on out. You should have a clear understanding of the position and direction the shadow innately falls in. Also, consider the point of disappearance for your object.
You can also select specified areas of your shadow and make autonomous changes to adjust the shadow and give it a more natural and realistic look. Consider setting the Adjusting Mode of the shadow layer to Normal. This helps get the shadow layer a 100% fill.
- Specify an area of the shadow you mean to change with the Rectangular Marquee Tool.
- This allows you to transform, warp, and distort the selected portion of the shadow.
- Use the Paintbrush and Eraser tool to adjust and fine-tune the shadow after transformation.
- Change the layer blend option for the shadow layer to Increase
- Reduce the Fill for the shadow layer to 75% or lower according to your preference.
Adding an Alpha Channel
Your shadow should look quite realistic and professional. But it would become light and blurry in the process. To fix this by fine-tuning and specifying the opacity, an alpha channel would be the best solution.
The instructions are as follows:
- Go to Window -> Channels
- Open the Channels panel
- Select New Channel and click on the palette table
- In the new channel dialog box, rename the channel to Alpha 1.
- Make sure the Radio button is selected for the chosen area under the brightness indicator.
Adding Gradient to the Alpha Channel
- Keep the Alpha 1 channel selected from the Channels Make sure Look is enabled.
- Go to the Gradient tool in the panel
- Keep the background fixed to white and foreground to black (in the Options menu at the top of the window, make sure the slope is one-dimensional and fixed to black to white)
- Once the slope setting is acceptable, select the outer layer of the shadow.
- Drag and drop the gradient to the specified area of the shadow close to the target object.
You should have a red gradient in the specified area overlaying the image.
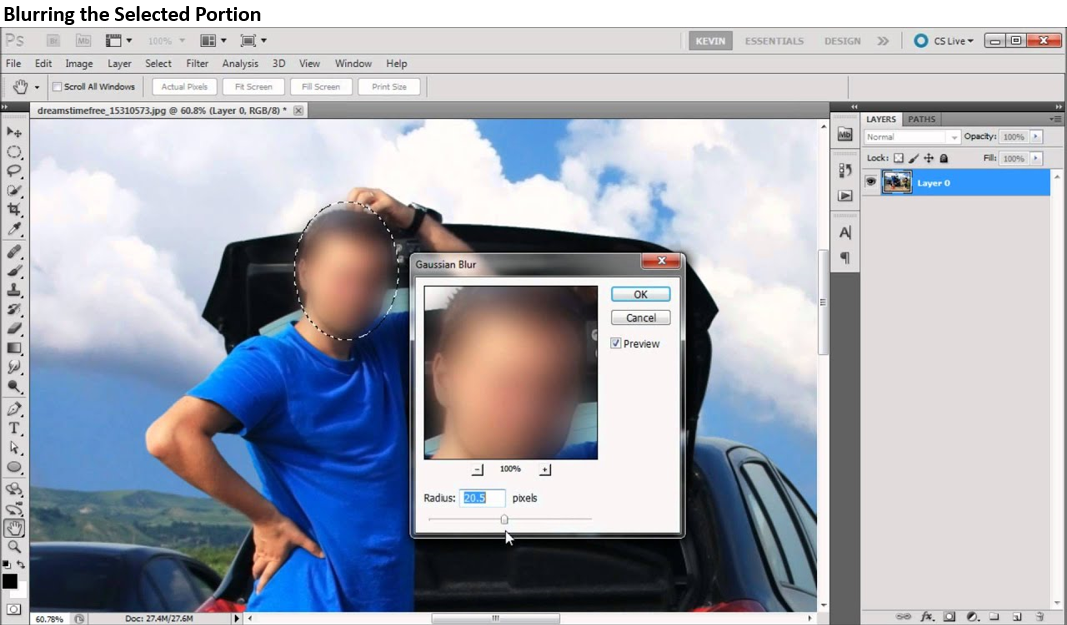
Blurring the Selected Portion
The red gradient over the photo displays how the mask in the channel works with your photo. Click the eye icon in the Channels panel to make the gradient invisible.
- Select the top channel in the Channels panel, choose the appropriate color channel (RGB or CMYK depending on the color profile for the photo) and deselect the Alpha channel.
- Keep the drop shadow layer selected from the Layers panel
- Go to Filter -> Blur -> Lens Blur. This opens up a dialog box with control over the obscure
- From the source dropdown menu, choose Alpha 1 under Depth Map.
- Set Blur Focal Distance at 0 and invert the check box.
- Leave the rest of the values at default and select
Adding a Layer Mask
- Go to Select -> Load Selection -> Channel and select Alpha 1.
- Make sure the radio option is tested.
- Click Ok once done.
- Go to the alpha channel and find the darkest part of the gradient
- Hit Ctrl+Shift+I on the keyboard or go to Select -> Select Inverse.
- From the Layers panel, click on Layer Mask.
- The shadow appears faded as long as the mask is being used.
Light Origin Point and Final Touches
- Make sure the entire shadow looks appropriate and realistic. Consider the origin point of light and make sure no part of the shadow is distorted from the natural path.
- Use the Eraser tool to remove any unnecessary part of the shadows.
- Go to Layers -> Layer Blend Style and set it to Adjust Blurriness until you get a uniform shadow.
Conclusion
With the process discussed above, you can make realistic and professional-looking drop shadows for your images and objects. Follow the steps carefully for appropriate results.


