
Layers are one of the vital characteristics of photoshop image editing. It helps make the editing non-destructive, allowing the transformations to be undone.
Creating a single layer from multiple ones is known as layer merge. Many of the designers and editors out there know how to merge layers. But they often pause on how to unmerge them. Can you unmerge layers in Photoshop? Yes, you can.
In this article, we will see how to unmerge layers in Photoshop. Also, you will learn to separate different elements from a merged layer from these approaches.
Let’s check out the methods.
How to Unmerge Layers in Photoshop?
Contents
The professional way of photo editing in Photoshop is using individual layers for every latest component. It will allow reworking them separately without affecting the others. But the trouble occurs when you have merged or flattened the layer into a single one, and you need to make some modifications now. If you do so, it will be a destructive technique of editing the file.
In this situation, the demand for unmerging layers comes in.
However, here is our 03 technique for unmerging in Photoshop.
Method 1: Undo Command
Undoing and redoing is one of the most straightforward methods for getting to recent editing points. So, you can comprehend that this method is the easiest among the 03 we will be discussing today.
Note that this method is usable after one instance of merging layers.
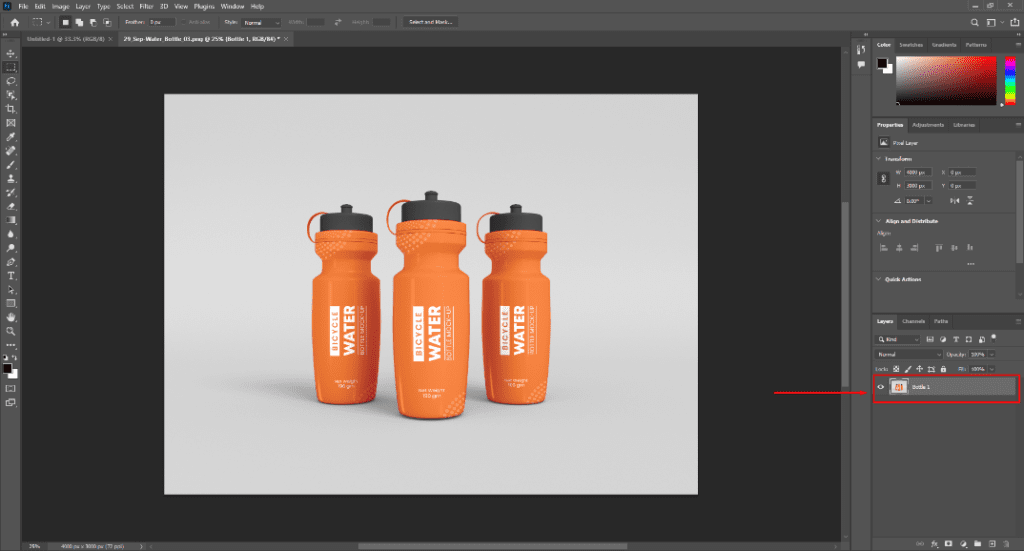
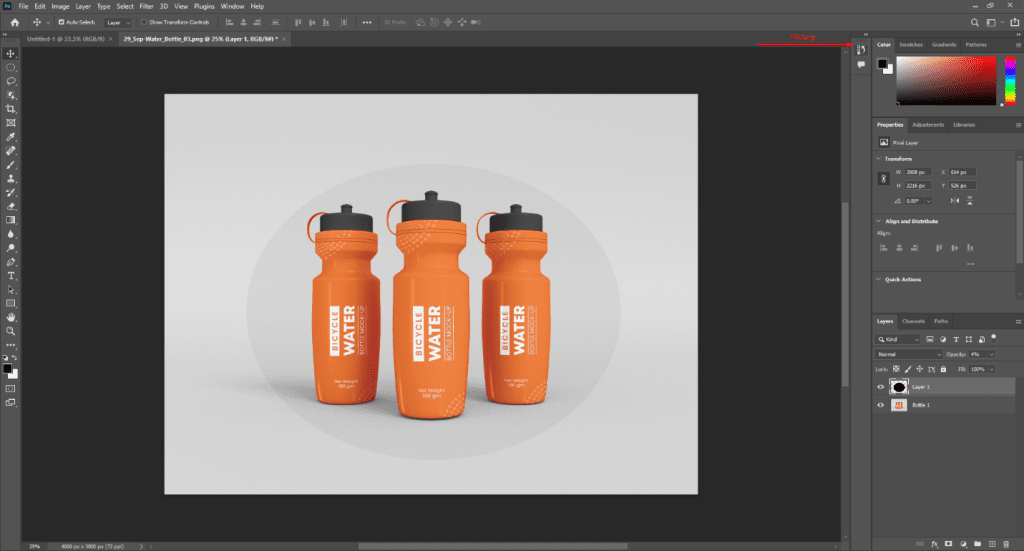
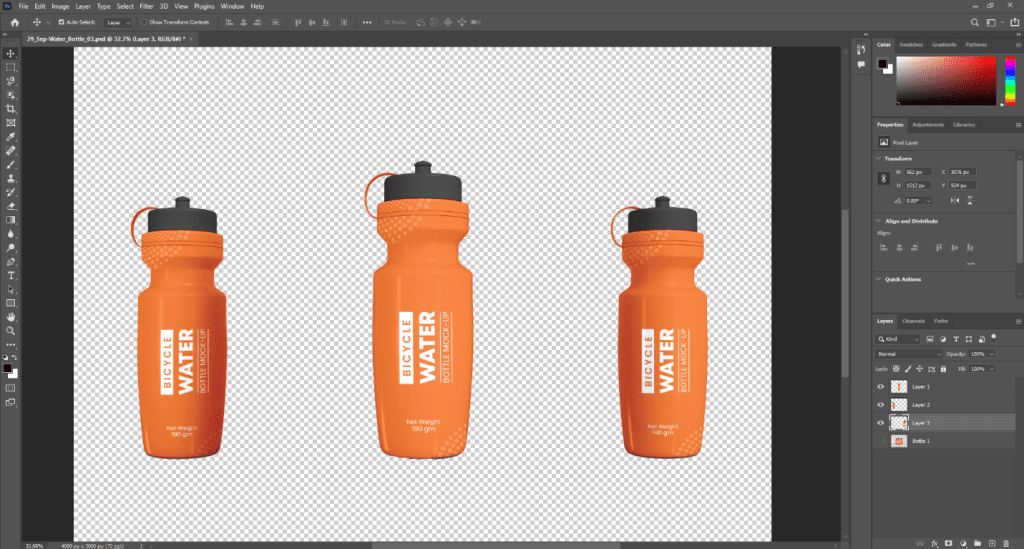
Here we have a layer merge consisting of three bottles. Now we will try to unmerge them into separate layers.
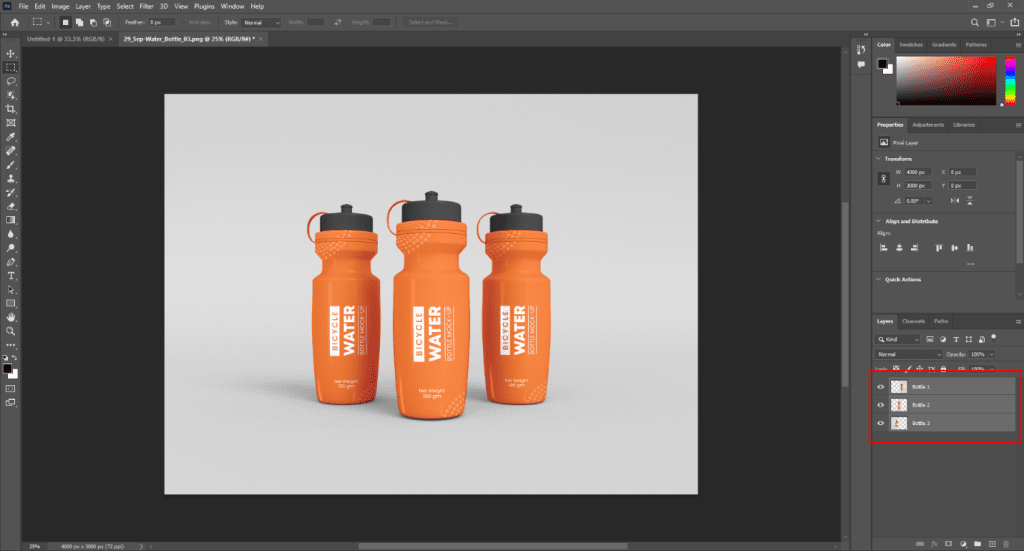
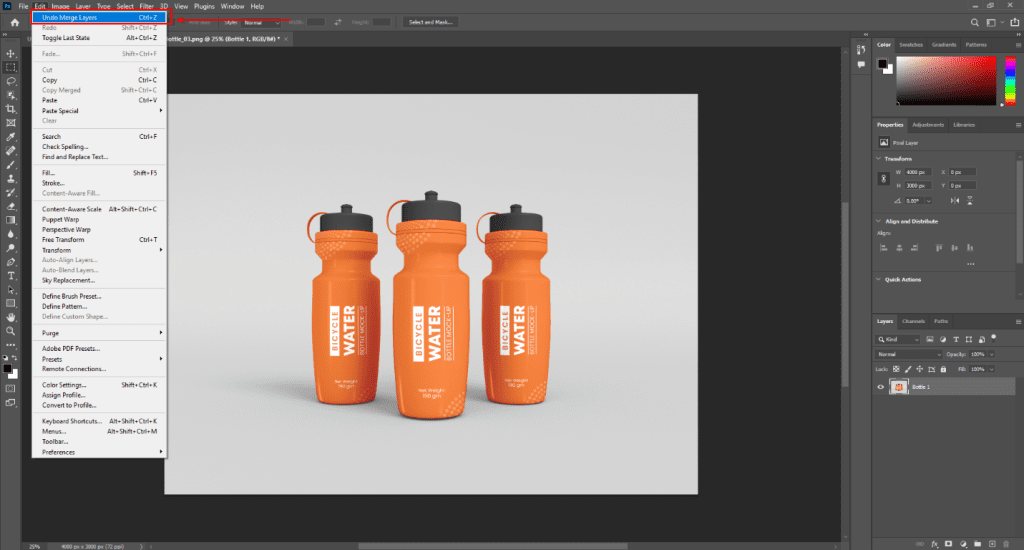
Go to the Edit menu and select “Undo Merged Layer” to revert to the previous stage.
Undoing the merged layer is accessible from the Edit panel. Here we have our three separate layers.
Now you can modify the individual items.
So, this is the first and easiest method. This technique only works when there is no change after the layer merge. If you wonder how to ungroup layers in Photoshop after making changes, luckily, there are other techniques. Our further discussion will cover the procedures.
Method 2: Use History
Using History comes into play when you have made several changes right after the layer merge. In this situation, you can not get to the “Undo merged layer” from the Edit panel. The option will not be there.
So, we have to use the editing history to find the merge action from the timeline.
Start by expanding the history tab from the top-right corner of the viewport.
Sometimes you may not find the History menu. Then you have to locate it from the Window panel of the top menu and check the box next to where it says “History.”
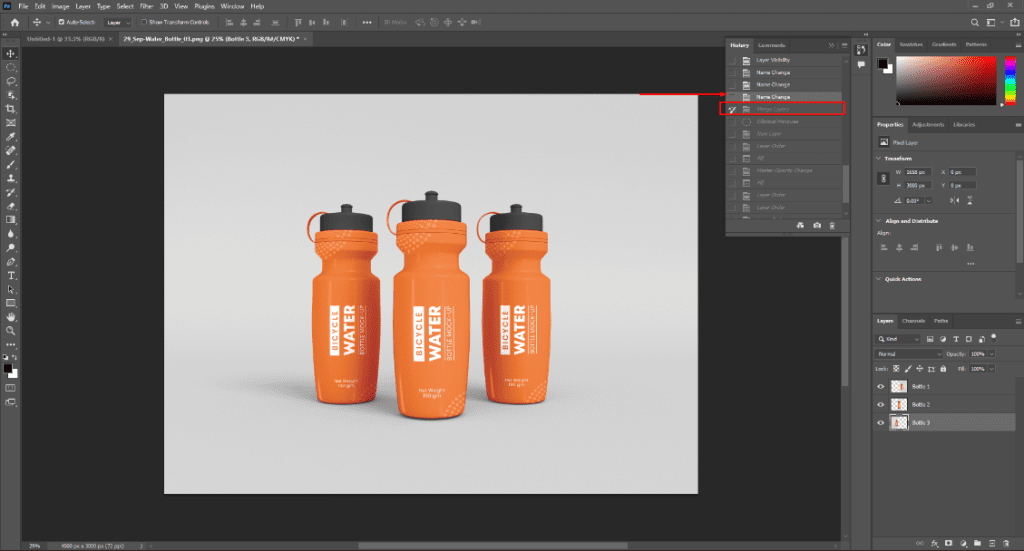
All the modifications will be listed when you expand the history panel.
Find the “Merge Layer” action from the history. Our goal is to get to the previous stage of layer merge. So, press the immediate prior history of Merge Layer, and you will get there.
Going back to other restoring points is the same. Click on where you want to get back on history, and you are ready to go.
There is an important thing you should think about before going for this method. All of the single changes you made after the merge will get undone when you get back to the unmerged layers. So, here is the catch. You will have to make the modification again.
To close the History panel, click on the icon or double arrow atop, and it will disappear.
That’s all for our 2nd method.
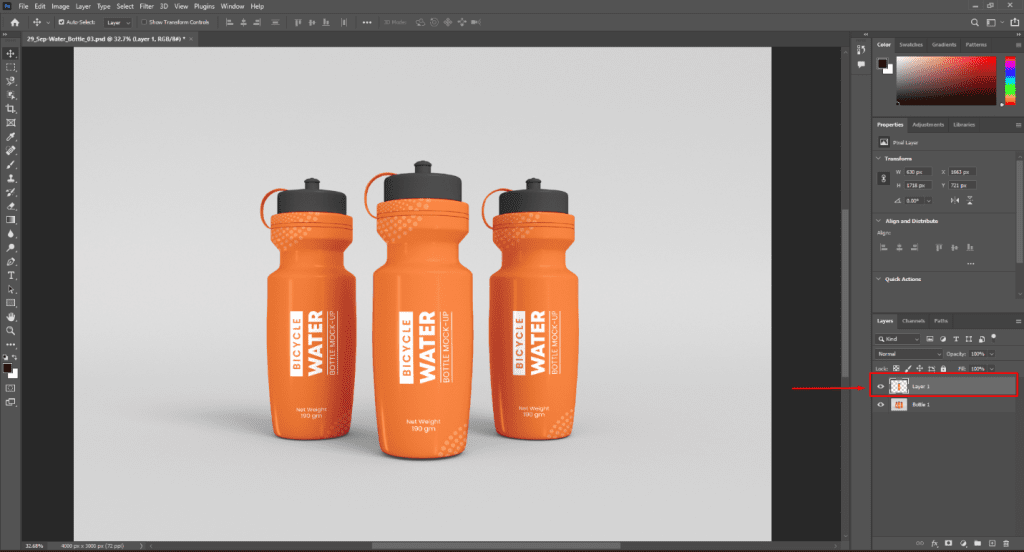
But there can be a situation where you have a single image file with no layers. Or editing file is a single image, not on PSD or AI format. So, what will you do to separate the different components from the picture in this scenario?
Here the 3rd method is necessary. Let us see how to unflatten images in Photoshop when we have this case.
Method 3: Selection Tool
This method involves separating elements from an image with the help of the Selection Tool. This process is not straightforwards as the previous 02 methods.
There are multiple selection tools available on the Photoshop Toolbar. Such as the Object Selection tool, Magnetic Lasso Tool, Pen tool.
You can choose any tool that is comfortable for you to select the element you want to separate. I will be using the Object Selection Tool.

See here; there is a single image layer, not a merged layer. We have an image file apart from the PSD format.
Now, we choose the Object Selection Tool from the toolbar and select the bottle in the middle. When you have the object selected, press “Ctrl+j.”
This command will copy the selection on a new layer.
Now you have to do the same for the other elements.
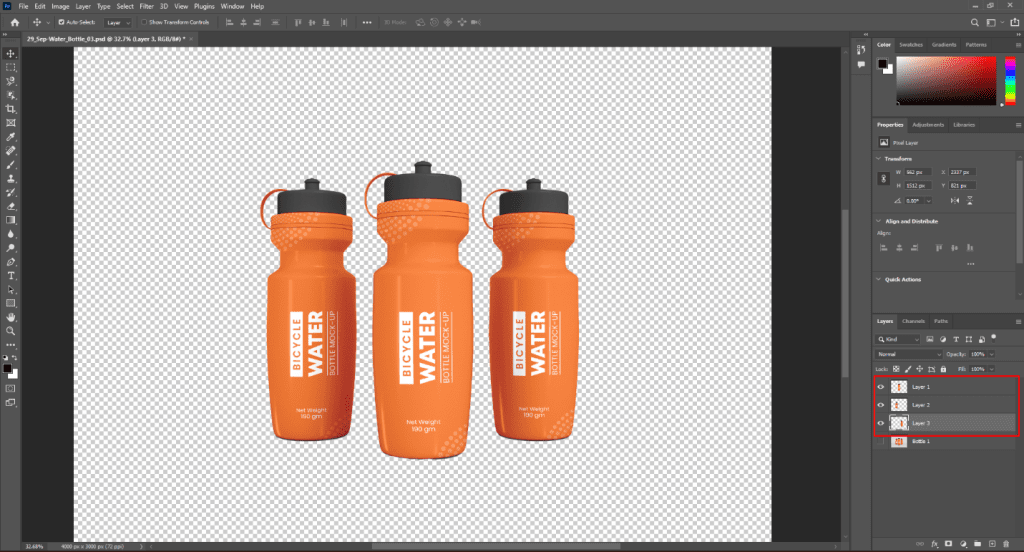
Here we have our 03 separate elements as different layers. Turn off the Eye of the main image file to verify distinct layers.
Here we have made the selection quickly with Object Selection Tool. Because the Graphics was not too complicated, you may have to use other tools, like the pen tool, to select the complex Graphics.
Now you can move or modify the individual layers.
This method does seem a bit complicated, but it is not. As long as you make the selection rightly, there should be no problem.
With this method, you can get your desired result for any image or graphics.
Read More: How to Copy a Layer Mask in Photoshop Elements
Instead of Merging, Make Group
If you have trouble dealing with merged layers, you should Group them. Grouping will enable you to access the layers on a folder. You can also modify the layers separately.
Press control and select the layers you want to put inside a group. After selection, press the folder icon at the bottom, and the Grouping is done. You can rename the group by double-clicking on the text.
Here you can access all the layers separately. This method of merging layers in Photoshop is quick with simple shortcuts.
Merge into a New Layer
Photoshop allows you to merge all the layers into a separate new layer with another method, and it also keeps the individual layers intact.
Now press Ctrl on your keyboard and select the layers you want to merge. Hit Ctrl+Alt+Shift+E, and you will get a completely new merged layer.
Final Thoughts
Here are our three methods on how to unmerge layers in Photoshop. These processes are easy and should not be a hassle for anyone.
Now you know the processes and also the methods for preventing merge issues. As you go along with your editing skill, you will learn more and more tricks to avoid any complications.
You can follow this video to unmerge layers in photoshop:
Frequently Asked Questions
You may have some queries on your mind. We will be answering some.
Can I unmerge layers in Photoshop?
Yes, you can. Unmerging layers in Photoshop is accessible in most cases. Sometimes there can be a minor hassle. The processes are straightforward.
How do I hide all layers except one in Photoshop?
On the left side of each layer, you will find an Eye icon. Clicking on there will hide/unhide the item. Keep the Eye open for the layer you want to see and Keep the Eye closed for the rest of the layers.
What is layer visibility in Photoshop?
Layer visibility tells whether you can see or change the layer or not. When you turn off the eye icon, the layer is invisible; thus, you can not modify the layer.
How do I get my layers back in Photoshop?
If you want to get back the layers instantly, then press the undo command (Ctrl+Z) on Photoshop. Or you also can get back your layers from the history panel.


