
Want your products to look natural and professional to potential customers? In that case, there is no alternative to ghost mannequin photography. They give your photo a realistic and uniform look—especially for garments and fashion products—that people cannot resist but make a purchase.
Now, wondering how to do ghost mannequin photography. Don’t worry; the steps are pretty simple. Just need to know and follow them in the correct sequence. In the following article, we’ve provided step-by-step instructions and a bonus tip at the end. So your picture gets the exact look and vibes you want to create.
Let’s get started:
How to Do Ghost Mannequin Photography?
Contents
To guarantee that your photos are as true to life as possible, make sure to have a clear and neutral background.
Let’s begin the step-by-step guideline, so you can get to business right away:
Step 1: Arrange the layers

First, open the picture on which you would like to do the ghost mannequin photography. After then, double-click on the background layer to enable editing of that layer. Now, name the layer with “Front.”
Make a new one and put it behind the front layer, saving it as “Background.”
Then, to fill the new Background layer with total black color, press SHIFT+F5 on a windows desktop or FN+SHIFT+F5 on a Mac laptop.
Now the question may arise, why use the color black out of all?
Well, it is because if you establish a black one, you will be able to see your choices more clearly and precisely. Later, when your work is completely done, you can modify the background whenever required.
Note: Remember to set the background color to 100% white while working with black clothing.
Step 2: Choose the backdrop with the magic wand tool
In the Layers panel, ensure that the Front one is selected.
Next up, pick the Magic Wand tool from the Toolbar in Photoshop.
(If the tool isn’t visible to you, it might be covered by the Quick Selection tool. In that case, to display and choose the Magic Wand tool, simply click and hold on to this tool.)

Once the tool is selected, two buttons will appear in the options bar at the topmost of the program window: Choose Subject > Select > Mask.

At the preview window, you will find a total black display. (If anything other than a completely black screen appears, press Cancel and ensure the Front one is selected.)
Rest assured, as nothing will get deleted, everything is protected. Your next task is to ensure that the View is set to On Layers (Y). At the screen’s top, click Select Subject.

Photoshop will try to identify the subject and make a selection in line with that.
This option will certainly work if your original image includes a robust background with different shades from your clothing.
You can work with the selection using the tools located on the left region of the Preview. They work as ideal assistance while working with the choosing.

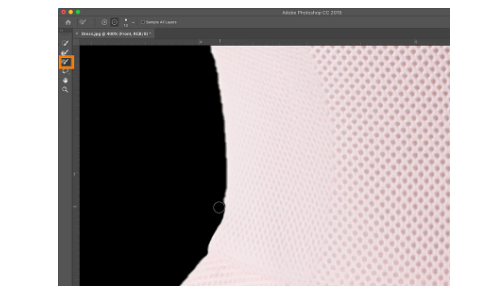
In case you require to fine-tune the selection (for example, to smooth off the wavy/rough edges on the left portion as in the image above), then there is also a way.
Just use the Refine Edge/the Brush tool on the left region of the Preview to paint along the selection’s edge.
Step 3: Choose the mannequin using the Magic Wand tool
The next phase is using Photoshop to remove the mannequin’s clothes.
Select the subtract from the options at the topmost of the Preview after selecting the Quick Selection tool (The Add and Subtract resemble “plus” and “minus” signs enclosed by dashed ellipses.)
Click on the mannequin portions yet visible in the Preview to choose. Once selected, all these places will get vanished away.
To undo, use CTRL+Z (COMMAND+Z on Mac). And if you have unintentionally removed a portion of the clothing, no worries. By decreasing the “Size” available next to the selection tool, you can fix it.

The selection doesn’t have to be precise, but it must be accurate enough for you to feel comfortable using the Eraser tool to remove any extra pixels from the picture.
Move the Shift Edge slider to the left in the Preview Window’s right-hand corner by around 30%. This will help reduce any halo impacts on the selection by moving it slightly inward.

Lastly, select Ok.
Also Read: How to Take Pictures of Clothes Without a Mannequin
Step 4: Make a layer mask
To remove the subject’s background, first, choose the Front layer and then click on the mask, available at the Layers panel bottom’s region. Next, pick the mask symbol located next to the Front one.

Check whether the foreground and background colors are adjusted to black and white before selecting the Eraser tool from the Toolbar. Remove any traces if it remains.

Step 5: Make interior selections
Now for the second picture, which depicts the clothing interior (for instance, the neck portion).
Once you have a pick of the actual clothing by repeating phases 2 and 3 with the interior shot, you can now easily create one.

Select the fabric’s neck portion using the tool named Rectangular Marquee.
To duplicate the selection and the mask, press SHIFT+CTRL+C (or SHIFT+COMMAND+C for Mac).

Next, select the Background layer in your front picture and press CTRL+V (COMMAND+V on Mac) to paste it.
Name this as the “Neck” layer.

To resize or rotate the neck layer, press CTRL+T (COMMAND+T on Mac). So the neck’s back aligns with the front of the neck and shoulders portion.

Repetition is required for any further areas of the clothing where the back area is visible.
For instance, in this example, the left sleeve is positioned so that the sleeve’s interior is clear and visible to the eyes. Based on your requirements, you can even change the picture orientation.

Step 6: Warping and cleaning up the interior parts
This process is what distinguishes a decent Photoshop ghost mannequin from a phenomenal one.
Remember that the interior of your garment was taken from a flat shot. However, you want those areas to appear as filled as your clothes front area. This is where the warp transform tool can do the magic.
Make sure to choose the layer you want to distort (for example, we will begin with the neck).
To activate the tool, select Edit > Transform > Warp.
Pull up the neck’s midsection using the Warp anchors to create a curvature like a real neck. Besides, this tool can be used to correct or modify any additional inconsistencies you want to resolve.

After adjusting the garment’s curve, use the Eraser tool to carefully erase any spots that don’t perfectly align with the neck’s top edge.
You can repeat the procedure on additional garment sections where you think the interior part is visible.

Step 7: Interior darkening
Moving on to this step, to complete the illusion that this picture was clicked on an invisible mannequin, drop shadows must be added to the internal parts of the clothing.
In the Layers panel, choose the Neck layer.
After then, from the drop-down menu at the application window’s top region, select image> Adjustments > Curves.
On the right-hand side of the Curves dialogue box, click in the line’s middle that cuts through the graph. Simply pull the line down when you notice that the neck’s interior has darkened the exact proportion.

Select the option “Ok.”
Repeat the curve changes on any more layers in case there remain visible interiors.
If you require additional darkening interior spaces, use the Burn tool from the Toolbar to “paint” the parts you want to darken.
Step 8: Alter the background color, if necessary
Bravo! You are nearly done now.
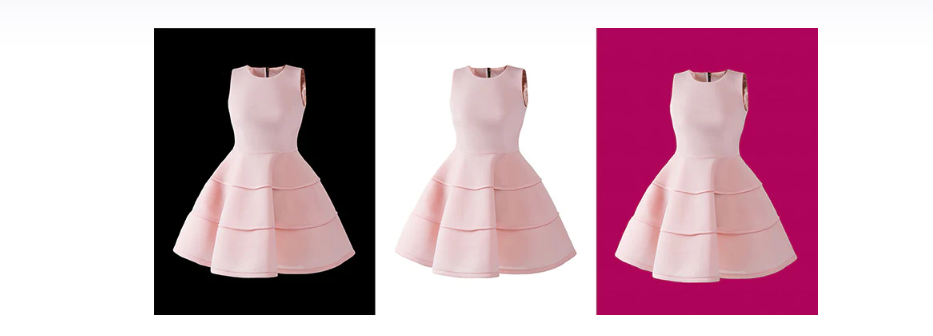
Return to the Background layer and modify it to white or any other suitable color. Since you made your pick using black, you can rest assured that your ghost mannequin will appear stunning to the eyes against any color.
Some Tips to Follow!
To make sure you have the best pictures to work with, keep the below points in mind during the photoshoot:
- Shoot apparel on a mannequin with symmetrical arms pointing down.
- If using a model rather than a mannequin, ensure their legs are uncrossed, and their arms hang down. Also, secure long hair and remove any jewelry that can make it difficult to see the clothes itself.
- When photographing clothes interiors, keep the camera and lightning in the same location. To achieve uniform illumination, fasten your clothing item to a piece of foam core or whiteboard and then raise the board to the same height as the mannequin.
- Keep backgrounds simple and neutral. The ideal backdrop is white/light grey which won’t reflect light.
- Ensure clothing fits on the mannequin properly, without wrinkles/gaps, and iron/steam clothing before shooting.
- Put your camera in the same height position as the object. Otherwise, the outcome will be distorted with the camera pointed incorrectly, needing extra post-processing effort.
To Wrap Up
That’s all from the detailed discussion on “how to do ghost mannequin photography?”
Follow the steps and tips as instructed, and the result will surely make the day for you. Although it may take some time to become a pro, don’t forget the famous saying, “practice makes a man perfect.”
Frequently Asked Questions
Check out the below queries in case you have any confusion in your mind to clarify regarding the ghost mannequin:
What is meant by a ghost mannequin?
Ghost mannequin, sometimes known as the invisible man effect, is a commercial photography method mainly used to create apparel photographs. It involves dressing a mannequin to create a realistic look in the final shot.
How does a ghost mannequin work?
With the ghost mannequin effect, you can snap several pictures of a product while it’s being shown on a model or mannequin, then combine the images to get rid of the model or mannequin in post-production. The result is an image that is realistic and thus will keep the attention firmly on your product.
What can I use instead of a mannequin?
Flexible Rod Forms, Partial Mannequins, Ghost Mannequins, Racks, Display Tables and Shelves, Baskets or Bins, Dress forms, and costumes are examples of other display items that you can use instead of a mannequin. It will suit both the character of your store and your budget.


