
Have you ever wondered how they make those perfect model photos in magazines and billboards? Only good photography skill is not enough to make that happen. There are more to make your model look flawless, called photoshop skin retouching.
You could generate professional model shots with minimal work using skin retouching methods. These would also be useful for beauty skin editing on portrait photographs. Let’s learn how to retouch skin in Photoshop for a more polished photo.
Step-by-Step Process of Photoshop Skin Retouching
Contents
The most effective photo retouching techniques allow you to enrich the subject – so they seem their finest – without causing hyper-realistic or artificial results. We will explain the entire Photoshop skin retouching method in this article.
It will provide clear and smooth skin for your model photos. The following tips are even useful whether you are a portraiture or fashion photographer. Following our detailed tips, you can clear up blemishes and make the skin look smoother.
Step 1- Open the image in Photoshop

To begin the Photoshop Skin editing, open the photo from the model photoshoot.
Go to File> Open in Adobe Photoshop and choose the photo from your hard drive.
It may take some time, but the program will display the photo on the screen. You can begin working on your image once it has been imported into the Adobe Photoshop interface. Ensure that you follow the steps in the correct order.
Step 2-Make a new layer

In Photoshop, make a new layer for skin retouching.
It’s now time to open Photoshop and add a new layer. The background layer must be duplicated. You might replicate the layer by right-clicking on it and selecting duplicate Layer.
In contrast, if you’re using a Mac, you can duplicate the background layer using Ctrl+click. On both platforms, a new layer would appear in the layer panel.
Step 3: Choose the spot healing brush
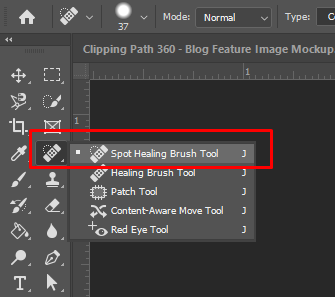
After creating a new layer in Photoshop, choose the Spot Healing Brush tool. You can find it on the left side of Photoshop’s toolbar. You could also use the Shift Key + J shortcut to bypass the entire spot healing brush tools and others in the section.
It is an excellent tool for removing pimples and other skin imperfections. The following section also allows you to customize brush size, patterns, and other aspects.
Step 4- Utilize the Content-Aware Fill

Select the spot-healing brush tool and change it to content-aware fill.
You might also change the brush size with brackets “[” + “]” to make it bigger or smaller. Customizing the brush size and intensity is much easier.
Changing the stroke to content-aware fill would be ideal for Photoshop. It allows you to eliminate the flaws from a face much more quickly. Remember that after you select the spot-healing brush tool, the “content-aware” option will appear in the upper section of the bar. It’s a required step in the Photoshop skin retouching instruction that follows.
Step 5: Erase Blemishes

Zoom in on the imperfections or areas you want to erase from your shot. Ensure your brush is somewhat larger than the flaws you want to eradicate.
When finished, click on the pimple or blister. The preceding Photoshop skin retouching method removes imperfections like magic. It would be helpful if you continued to click on the flaws you wanted to erase.
Photoshop frequently employs samples of skin texture. As a result, it only requires one click to operate. If it persists, increase the brush size and continue clicking. However, the following procedure is beneficial.
Step 6: Run the Spot-Healing Brush over the pimples.
To begin removing skin blemishes, open Adobe Photoshop and choose the Spot-healing brush tool. It’s an excellent Photoshop skin retouching tool. Thus, look in the left tool panel for a spot-healing brush tool with a dressing icon.
Alternatively, you can use the shift key + “J” to place the brush tool directly on your mouse pointer. It’s a great Photoshop tool for getting smooth skin.
Step 7: Use the mouse to cover the blisters or scars
Alter the brush tool with “[” and “]” to make it slightly larger than the pimple. Press over the pimple once the brush size is sufficient to cover it. And Photoshop would analyze the surrounding area before erasing the pimple. The task can be completed with a single click.
Step 8: Apply the Spot Healing Brush to the second blemish
When you’ve finished with the initial blister or spot, move on to the second. Examine the affected area for any facial spots. Adjust the thickness of the Photoshop spot healing brush.
Now, float your mouse over the particular spot and select it. And it would immediately vanish from the scene.
Step 9: Recheck if the second blemish got fixed or not
Did the second spot disappear? If it didn’t, you have to select and press the spot for few times. You must ensure many brush sizes to cover the spot correctly and avoid these situations.
Step 10: Don’t clean the spots unnaturally
One thing to remember when working on Photoshop skin retouching is that you should only perform on short-term skin conditions. Some stable face spots or marks should not be edited because they may change the original appearance.
Furthermore, it may not be easy to distinguish the face from the edited image. Keep these considerations in mind when dealing with skin blemishes.
Step 11: Save the final image
Finally, go over the final image from the next retouching tutorial. If you still need to cover any skin blemishes, do so before closing the File.
When you’re finished, save the Photoshop image file with your changes. You can save the Photoshop file after you’ve finished adjusting the effects.

What to Keep in Mind When Retouching Skin in Photoshop
When learning to retouch skin in Photoshop, there are a few things to remember. These will assist you in avoiding problems while retouching your skin.
We’ve listed a few of the things you must take into account:
- When retouching skin, be sure to zoom in on the area of the skin.
- Instead of brushing the entire skin area at once, focus on retouching the specifics of the skin.
- Always copy the image feature layer before performing skin retouching. As a backup, keep a preserved image layer.
Final words
If you are doing it for the first time, it can be a complicated process for you. Well, some edits may require several layers to produce the desired results. A basic understanding of operating with Photoshop layers may help you learn faster. However, we are confident that the above steps can help you retouch your skin in Photoshop.
There are numerous methods and techniques for retouching different goods, drawings, and paintings, but Photoshop takes the cake. Photoshop is a lifesaver in image editing because it provides you with a wide range of photoshop tools to work with.
Frequently Asked Questions
How do you touch-up skin in Photoshop?
If you only want to make a few minor adjustments, the Spot Healing Brush Tool is a good choice. Try clicking on any dark spots or blemishes, and Photoshop will attempt to correct them automatically. It is a fast and easy way to make your subject appear smoother and more flawless.
What is the fastest way to retouch skin in Photoshop?
You can use the spot healing tool to retouch skins within a short time. You can eliminate zits and dark spots on your skin with a few clicks. Utilize skin retouching plugins if you wish to digitize the entire process.
How can I make my skin look smooth?
Select ‘Enhance Adjust Color for Skin Tone from the menu bar.’ Click on a skin area that you wish to alter. Click around until you find the results you want. You can use the ‘Skin and Ambient Sliders’ to make additional changes.
How do you blend skin color in Photoshop?
First, choose the skin color and make a small selection across the skin. Make a Curve Adjustment Layer and adjust RGB values at every Curve channel. Go with the RGB values applying effects with a layer mask.
How can I make my skin look smooth?
- Launch Photoshop Elements and open a photo.
- Select Enhance > Smooth Skin.
- The face is selected automatically in the dialog box.
- If the image contains multiple faces, all face images are highlighted.
- Click the face you want to change.
- To achieve the desired effect, move the Smoothness slider.
- To review the changes, use the Before/After switch button.
- To go back to the original photo, click Reset.
- When you’re satisfied with the outcome, click OK.


