

Photoshop can do wonders only if you know how to utilize the tools. Considering that, Photoshop doesn’t have a dedicated tool for inserting bullet points in Photoshop.
Basically, bullet points are the elements of a word processor. And photoshop is solely a photo editing application.
So, you need to put it manually. Also, you can add bullets point in photoshop.
You might need to add bullet points for creating a list in a brochure or making a social media post. Or, you need it to split paragraphs.
Whatever the purpose is, this guide will help you place bullet points inside a text box.
Also, I will give you details of 5 extra editing tips related to inserting bullet points in Photoshop. That will be truly beneficial for new learners.
How to Make Bullet Points in Photoshop
Contents
There are a couple of ways one can enter bullet points in photoshop. One is for advanced learners, and another is rather for beginners.
Find out those below!
4 Ways to Add Bullet Points in Photoshop
Basically, here are two ways. One is a shortcut, and the other is an elaborate process. I will start by telling you about how to add bullet points in Photoshop using a shortcut.
Method 1: Using a shortcut
The easiest way to create a bullet point in Photoshop is to use the keyboard shortcut Alt + 0 + 1 + 4 + 9 for Windows or Option + 8 for Mac OS. While the Type Tool is active, this shortcut will add a single bullet point to the selected text layer.
For a Mac
Option + 8 – is the shortcut for inserting bullet points on a MAC.
For Windows
The shortcut for the Windows is – Alt + 0 + 1 + 4 + 9.
Point to be noted
You must have the TYPE TOOL activated and a particular text selected to add a single bullet point in front of the text.
Method 2: Utilizing the Glyphs panel
If you are new to Photoshop, then you better follow this method. Because you still don’t know how to use a lot of tools.
You can follow: How to Use Pen Tool in Photoshop to Cut Out Images
Don’t get me wrong. This is not to dishearten you by stating that you don’t know many stuff of Photoshop yet.
I am suggesting that this process is an excellent opportunity to learn about some tools and options on photoshop.
Let’s start with the steps one by one!
Step 1: Adding a new document
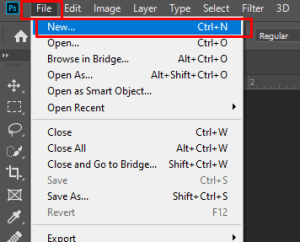
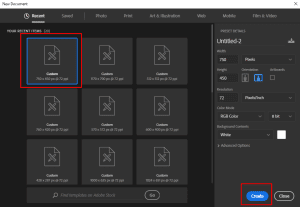
Once you open the application, click on FILE from the command bar. A new window will appear with several sizes for creating a document.
You can select any size for a practice session. Not to mention, the size will differ while performing a major task.
Next, you can zoom in if you wish. It will help you place the cursor in front of a text faster.
Step 2: Adding a text box
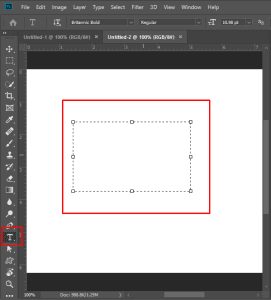
In order to add a text, you need to select TYPE TOOL. That is possible in 2 ways.
Process 1
You can simply press the T on your keyboard.
Then you left-click on the mouse and drag the cursor on the white page. You can keep dragging until you get the desired text, and then you release the mouse.
Know that you can change the size of the box later on.
Process 2
You will notice a vertical command bar by the left side of the Photoshop interface. Next, find the T icon from that panel; that’s the typing tool.
Once you click on that icon, the TYPE TOOL will be activated. Next, you make a box by left-clicking the mouse and dragging the cursor on the blank page.
More about text boxes
There are two kinds of text boxes. One is- AREA TYPE, and another is POINT TYPE. Here is a brief idea about them.
AREA TYPE lets you draw a text box. Primarily, this is where you put all the texts in a single size. But, you might need to change the size of a specific set of texts.
In that case, you need to covert to POINT TYPE. And, it’s mainly used to have scalable texts. Moreover, it doesn’t give you a box. Instead, it gives a cursor.
This way, you can directly write on a blank page without a text box and then change the text as you want it.
The one we are making here is AREA TYPE.
Step 3: Adding bullet points
Time to shoot some bullets! You can copy some of the lorem ipsum texts to add bullet points. What is lorem ipsum text?
It’s a dummy text that people use so they can see how a specific content would look like. Or you can skip adding texts and start adding bullet points in the empty canvas.
You will find it online effortlessly. Just make a search writing, ‘lorem ipsum text.’ Next, visit the first site from the search list to get the dummy text.
However, we suggest you include some texts, if not lorem ipsum. That’s a better way to practice and learn.
Forming paragraphs or lists
Select, copy, and paste some text. Ctrl + A for selecting, Ctrl + C for coping, and Ctrl + v for pasting.
Once you have some text in the box, separate it into different portions with entering. That will generate several paragraphs.
But, you can add less text too, maybe one word or two. This will rather make a list, not paragraphs.
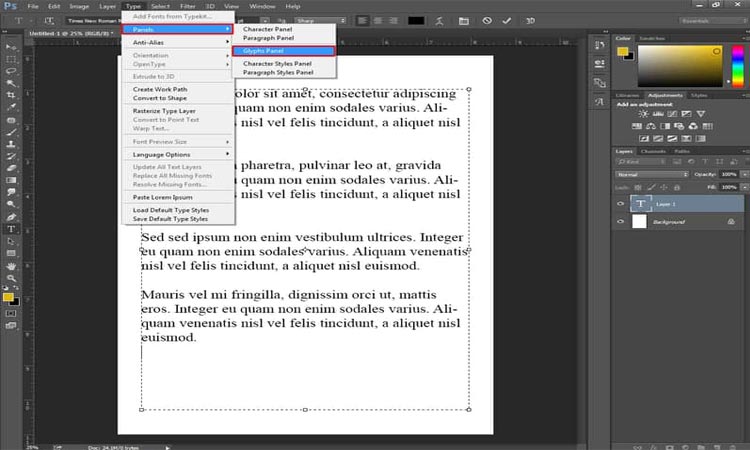
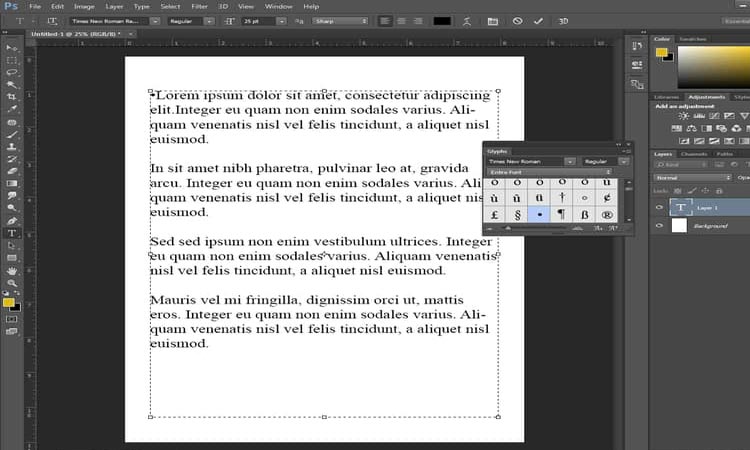
Going to the Glyphs panel
Now, go to the top bar on Photoshop windows. There, find the option TYPE. Once you click on the option, you will see a drop-down menu.
Take the cursor to the first option named PANELS. Another list will be there. And, there you will find GLYPHS PANEL.
When you select the panel, another window will appear with different symbols and characters. In there, choose Myriad Pro font style.
After that, double click on the symbol, and it will be added in the text box or in the place where the cursor is.
Overview of the process
Open Photoshop > File > Create a blank page > Select Type Tool > Create an Area Type text box > Go to the option Type > Click on the Panel option > Then you get Glyphs Panel > A window with symbols and characters will be there > Change the font style into Myriad Pro > Double click on the bullet point symbol.
Method 3: Using Ellipse tool Photoshop
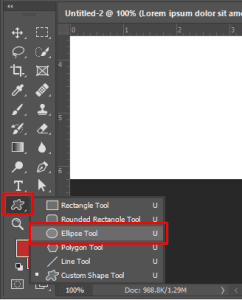
This time you draw a bullet point in Photoshop. To do that, select the Ellipse Tool.
Once the tool is selected, hold the SHIFT button. And drag the cursor to make a perfect circle.
Next, you fill the circle. Click on the SHADES from the second horizontal command bar from the top. Then you select the desired color of the bullet points.
There you have it!
Method 4: Copy-pasting a bullet point
This option is the easiest. Just copy a bullet point from somewhere. Then you copy and paste it on the canvas in Photoshop.
Read Also: How to Add a Drop Shadow in Photoshop
To warp-up
Now, you’re all set to work to create bullet points in Photoshop. We have suggested 4 different ways. Some methods will render faster results, and some will take a while. You utilize the ways depending on time and purpose.
Follow this video:


