

A clipping path is a vector path or shape used to cut out an image. Anything inside a path will be included after the clipping path is applied. And portions that aren’t a part of a path you’re creating will be left out. That way, the selected portions will be clipped.
Manipulating the background from an image are some primary clipping path purposes to be carried out by professionals.
Using the clipping method to edit a picture, such as removing the image background and replacing the item with a different colored background, is a highly efficient way to make the image appear more appealing.
So, let’s learn how to apply a clipping path in photoshop.
How to apply a clipping path in photoshop: 5 steps
Contents
You can complete it in 5 steps. Check the steps below.
Step 1: Use the pen tool to create a work path
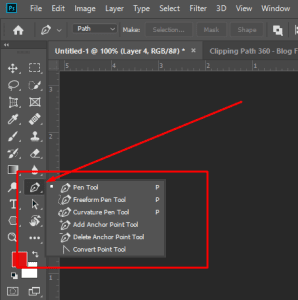
Select the ‘Pen tool’ by hitting ‘p’ on the keyboard. Make sure that the ‘Paths’ panel is available so that you can preview the path as you draw it.
Now create a path around the line of an object in the foreground. Then clip that path so you can’t see the rest of the background or the other lines once you import it into Illustrator or InDesign.
Start by drawing the path. When you’re on a path, you can look in your path panel and even see the path being created in real-time.
Read More: How to Use Pen Tool in Photoshop?
Step 2: Adjust point with Direct Select Tool
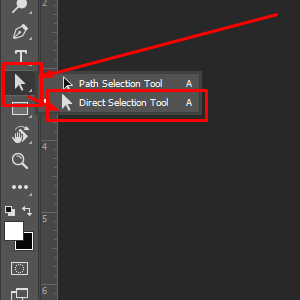
You can go deeper into points and adjust the points. The ‘Pen’ tool is great for that.
Because if you use the direct select tool after you connect the dots from start to end you can adjust points in the created path. Thus, you can adjust the points and get the desired path by zooming in.
After a complete path is created, it’s still not a clipping path. Meaning that if you are to bring this into InDesign, you would still see all of the backgrounds. And if you are to look in the ‘Paths’ panel, you can see the working path.
Know More: What is a Clipping Path
Step 3: Save the path

After creating the work, you need to save the path. So, go to the menu flyout in the ‘Paths’ panel and click on ‘Save path.’
This is the next step because the upcoming step will be to clip the path. But you will see ‘Clipping path’ is grayed out. But to yield it, you need to make the path and then save it.
Step 4: Apply clipping to the path
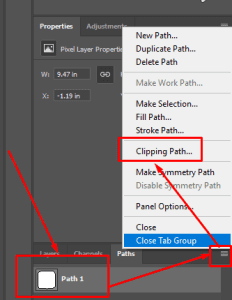
Once ‘Clipping paths…’ is available, click on it. Next, highlight the path that you’ve created.
Now, if you look at the main document area, you won’t see anything different. However, you will only see that in the ‘Paths’ panel.
Now go to the ‘File’ menu and click ‘Save as. You can save it into a folder here as a ‘tiff.’ However, clipping paths these days can be applied to JPEGs and PS DS. But you can just do ‘tiff’ for now. Next, save it and confirm the default option.
Step 5: Placing a file after clipping
Now, slide over to InDesign and place it. To do that- go to the ‘File’ menu. And select ‘Place’ or hit command D.
Now, even though you apply a clipping path, the background will still be in the preview. But when you place a clipped file, the background is hidden by that clipping.
Wrapping up
So, this is how to create a clipping path in Photoshop. You see- Photoshop Clipping path hides objects/portions of a certain image.
So it doesn’t remove. The background will still be visible when you use the direct select tool and hover over a specific path. As a result, it will just be clipped.
Frequently Asked Questions
In case you have more queries, look at the questions below. They will provide you with extra information.
How do I cut a photo in Photoshop?
Step 1: Select “File,” “Open,” and then “Save.”
Step 2: Right-click on the object selection tool in the left toolbar after opening the image.
Step 3: Select “Quick Selection Tool.”
Step 4: Select “Sample All Layers” from the dropdown menu if you’re creating a composite image. And if you want more precise edge selection, click “Enhance Edge.”
Step 5: In the upper toolbar, click “Select Subject.” You’ll have to manually outline the subject in the foreground in older Adobe Photoshop versions.
Step 6: While your chosen area is selected but not yet cut out, click “Select and Mask” in the toolbar above your picture to smooth the edge of the area you’re cutting.
Step 7: Now that you’ve chosen your area, you have a few choices. If you want to remove a part of the photo entirely, simply press delete or backspace on your keyboard. If you want to use your cutout portion in another image, choose “Cut” from the edit menu, open the image you want to use it, and choose “Paste” from the edit menu.
Step 8: You can also cut and paste using the keyboard shortcuts command + X and command + V.
How do I make a clipping path from a selection in Photoshop?
Step 1: Import an image and select the desired portion in the picture with a tool.
Step 2: Go to the toolbar, find ‘Select’ and click on ‘Inverse.’
Step 3: Click on the ‘Paths’ panel and covert your selection into a path.
Can you make a clipping mask in Photoshop?
Yes, you must confirm that you have at least two layers because clipping a mask means a layer clipped into another layer. Furthermore, a clipped layer will only be visible within the boundaries of the layer it’s clipped into.
Otherwise, it’s just a base. How to make a clipping mask in Photoshop- Create layers > Set the one layer on top of the layer you want it to clip to > Right-click and select ‘Create clipping mask.’
How do you make a compound path?
Select the target objects > Go to the top bar and find ‘Object’ > Select “Compound path’ from the dropdown menu and select ‘Make.’ Shortcut: Ctrl 8. This way, Photoshop will recognize separate elements as a whole. When you make any change, it will affect everything in one section.
What is the Quick mask tool in Photoshop?
Quick Mask Mode is the fastest way to create selections. Also, it modifies existing selections that you’re working on. Additionally, the Quick Mask Mode button is this little icon at the bottom of the left toolbar. Or you can enter the Quick Mask Mode by hitting the ‘Q.’


